The Beginning Drummer
Introduction: A quick guide to the basics
I started playing music when I was a teenager. My friends were starting to take up instruments and I wanted to be a part of the excitement, so I picked the drums, figuring that it was going to be “easy”. Years before this I took some violin lessons in public school and found all the practicing and reading music very difficult and I wanted to get in the band without really working for it. The band that my friends and I formed was known as “The Hightones”.
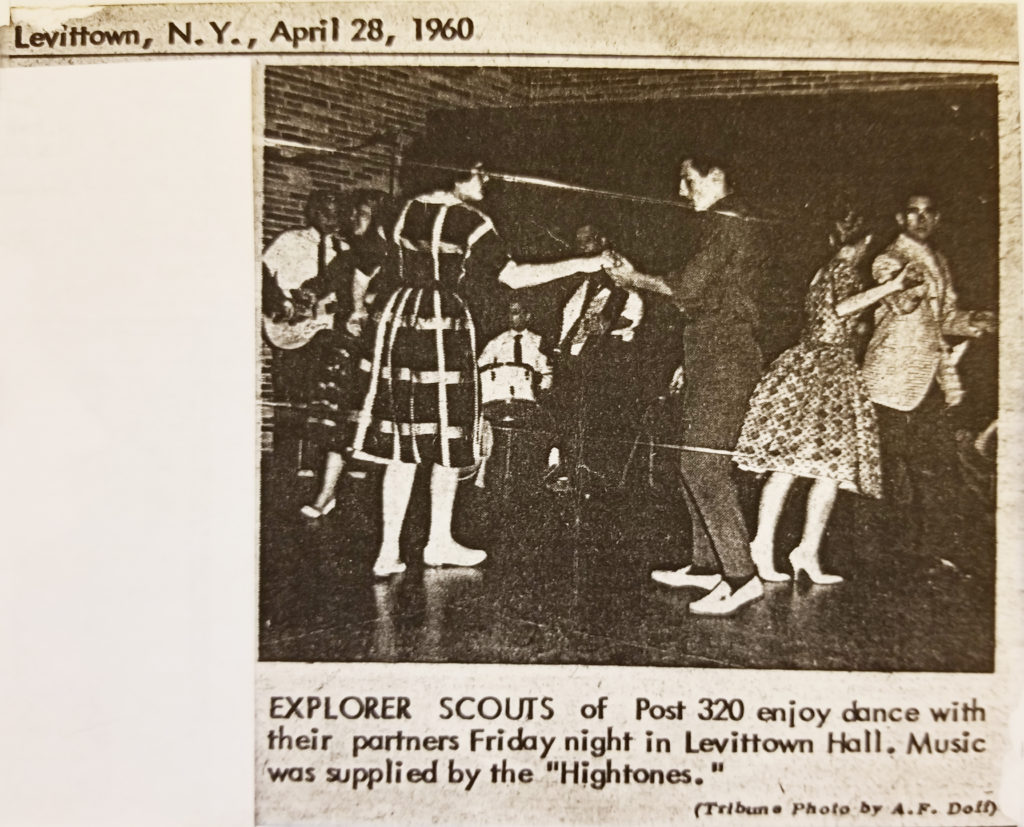
The first gig that we played was April 28th, 1960; I was fourteen years old. With barely a year of drum lessons, I scraped together a set of three drums, a homemade bass drum pedal, and a triangular wedge of wood to keep the bass drum from rolling away. There was no singer in the band, so we played instrumentals, as was the custom of most bands in those days, and we had a great time.
I studied with one of the great jazz drummers, Al Miller, in New York. His friend, Buddy Rich, the greatest drummer of all time, was a frequent visitor and I saw him play on many occasions. You don’t get any better than that for a superior education in drumming! By 1963, I had switched from jazz to rock’n’roll and I started a serious career in music. I learned early on that one must go where the music goes if you want to make a living. In addition to local places to play, I also played in the Alan Freed Rock and Roll Shows that were all the rage. This was my first contact with other bands of the day and with satin-clad girl groups who sang and danced – very exciting!
These were the early days of rock’n’roll with most singing groups consisting of four or more singers, each group with their own backing musicians. It was great fun playing with all the greats of the time – although many were not the mega-giants they were to become later on. I loved being with the musicians and the great audiences, who frequently asked for autographs.

Now it’s fifty-nine years later, 2018, and I still love to play music. Of course, I don’t look much like I did in those early days, but my skills have improved in concert with my experience. I’ve learned from the best, Buddy Rich, Gene Krupa, and so many more great drummers and musicians that it would take volumes to list them all. Suffice it to say that I’m really happy that I started in music so many years ago and I will continue to play, and to teach, and to pass on my experience to others.
But what’s so great about playing drums? Firstly, it’s exciting, and fun! There’s a feeling of control and the ability to “let loose” with one’s emotions all at the same time. You get to drive the band, to set the tone of the music, and to let the audience know that here is something to cheer. No matter your age or experience, people are listening to you, because you have something to say.
Secondly, playing drums is a great way to meet new people, to find out who they are and to let them know more about you. There’s no better attention getter than a drummer in a band. People are naturally attracted to the drummer. He’s the one you hear, he’s the one driving the beat that makes you tap along with the rhythm. And, he’s usually in the back of the stage and on a riser, so there’s an air of mystery about him, too.
Thirdly, playing drums allows you to learn about yourself. What you learn on your practice pad while you’re studying music tells you a great deal about yourself as a person. The many hours that are spent in the confines of your practice room, with or without other players, reveals so much about where you are, and where you want to go, in life.
You learn about your tolerance for repetitive practicing, you learn about your talent for music, your interest in the many facets of life, and whether you want to pursue music as a career. One of the most fascinating attributes of concentrated playing and practicing is the inner world of silence (no pun) that you are enveloped within to be with your own thoughts and ideas. No one can enter this private realm unless you let them in, and you get to be with your own uninterrupted thoughts for as long as you desire.
Playing and practicing drums has its own rewards. Just playing the instrument for pleasure brings a satisfaction as grand as any you can imagine. As your skills grow, you play better and better, and you can appreciate the pleasant sounds of your well tuned instrument. A drum is unique in that it is a totally acoustic instrument, unfettered with add-on sound devices or fancy electronics that can alter the sounds produced by the player. The instrument of drums is pure, it is primeval, it is an extension of you, the producer of the sounds – and emotional. Tuning your instrument to sound the way you want is an expression of your inner self and it is gratifying to learn to play the instrument so that it brings to the listener’s ear exactly what you feel. And, hopefully, he feels those emotions, too.
While many people feel that drums is an easy instrument to play, it is not. If you choose to play by “feel” rather than to learn to read music and to study rudiments, that’s okay, it can be done. Truth to tell, many a great drummer has started this way, thinking that drums will be easier to learn and to play than a melodic instrument, has come to find out that the studying is the same, just a bit more complicated. But the rewards are better, the feeling of satisfaction is higher, and the accolades are more numerous.
Think about it, most instruments require two hands to play; drums require two hands and two feet. Most other instruments require only the independent movement of the hands; drums requires coordinated independence of all four appendages, while thinking (or feeling) about how to present the dynamics of the strokes on the drums, cymbals, and other percussive traps – all at the same time. If reading, most instruments have only one or two lines of music; drummers must navigate at least six lines of music, one for each drum, cymbal, highhat, and more. Reading drum scores requires lots of study and practice, but it’s worth it in the long run.
But you don’t have to go that route if you don’t want to study that much. To play most music that you hear on the CD’s and DVD’s, all you need is to find a good drummer and take several lessons to learn how to make the sounds you hear and to learn the few rudiments that it will take to make you an acceptable player. You may not want to make music a career, you might want to play just for fun, or you might just want to play because it interests you for the moment. Any reason to play drums is okay, fortunately, there are no limits to how far you can go.
This writing is presented to not only give you an appreciation for what a drummer can do, but also, how to do it. We’ll show you what you need, what you need to learn, and some techniques to practice. Also, some of the inner workings of the equipment and some things to be aware of will be included throughout.
This article includes practical audible demonstrations to illustrate some of the material. If, after reading this guide, and viewing the video demonstrations, and practicing a lot, you decide to make drumming a more serious endeavor, you will need to find a good drummer who has, not only experience in playing, but also a talent for teaching the instrument.
Remember, there are millions of drummers out there, but not all of them can play well. Start practicing the pointers in this writing seriously, and you will be on the road to learning how to play correctly. The practice is worth doing no matter what your intentions are for the future. No matter what roads you take in life, the studies that you undertake now, and the disciplines that you work at, will pay huge dividends later on.
How important are drums to the band? Well, I learned many years ago that if you are going to start a band to play popular music, dance music, or high energy music, then drums is the second instrument you will seek. Of course, for any type of music you need a melodic instrument, like a guitar, or a keyboard. You need something to play the melody of the songs, but after that, when you need the fill, the background, and the drive to make the songs come alive, you need a good drummer who can make that melody sing! Buddy Rich, when asked what a drummer adds to the music said: “We really don’t know what drums add to the band, but they make the music sound better.” I agree.
What Do You Need?
A Strong Desire to Play Music
A strong desire to play music – especially drums. If you are looking for something to do, and you think you want to try music, that’s okay. But, to succeed in music, and as a drummer, you need more than a casual interest, you need to dive deeply into the instrument; you must see drums as, not only a natural asset to the band, but also an end in itself as a solo instrument. Commitment, like most things in life, is the magic glue that cements us to success. You might watch drummers, especially the guys from the early years of music, to catch some of their enthusiasm. In a short time, if you don’t pick up something from them, you are probably not as interested as you think right now. However, if you watch Gene Krupa play in those old movies, and you can envision yourself sitting behind his drums, then you might be ready to embark on a career as a drummer. Of course, it takes much more than watching a few drummers play to find out if you want to make the commitment, but when you watch others play, and you feel as though you are being “pulled” into the music, you could be ready!
Family Support and Encouragement
As much as we like to think of ourselves as strong and independent, people do much better when they have the support of loved ones and friends. A friend, as you probably know, is someone who will tell you the truth, even if it hurts you – but he will also be there to support you to keep you from falling. You can figure out things in life with good friends and insightful family members. If you are embarking on a career in music, you will have an easier time if you engage the support of those around you.
Direction
In music there are so many ways to go that it can boggle the mind. You might want to be a performer on stage in a popular band that travels between engagements, or you might want to teach in a music school where you have the satisfaction of guiding others towards their goals in life, or you may want to sell and repair instruments for a music store, or a hundred other possibilities. You will need to sit down with your family to try to decide the best course of action in terms of type of music, selection of equipment, resources, satisfaction goals, and career possibilities. If you choose, for example, Jazz as your passionate interest, then you must choose the proper equipment, the teachers, and the types of people in the field of Jazz to nurture your interest. It is the same with Rock, or Folk, or Classical music. Find your direction, then you can concentrate fully in the medium and you will become better, faster than if you cannot pick a direction early. Certainly, if you decide on one direction, follow it for a time, and then discover something else more appealing, it is fine to make a change. Don’t worry about lost time. All of the practice and learning and contact making that you have done up to now will still assist you in the new direction. After all, playing a beat is the same in all music, the sticks are the same, and so on. All that changes is the style of music, the audiences, and the way that you approach the music. You may play loud, crashing, full solos and sweat producing sets in one kind of music, and then change to a type of music where you will need brushes and a light touch to play soft love songs. Any, and all, the training you have done up to that point will serve you well.
Equipment
Not only is the selection of drums important, it is also a lot of fun. Though there are many types of drum sets in use around the world, in this writing we will narrow our discussion to the classic drum kit used by drummers in almost every type of music, the four drum trap set. Basically, you need a snare drum, a bass drum, a small (or rack) tom-tom, and a large (or floor) tom-tom. Sizes can vary, but the standard size drums include a 14×5 inch snare drum, a 20×16 inch bass drum, an 8×12 inch small tom-tom, and a 15×14 inch side drum. From these standards, the sky is the limit as to the size of all of these drums. Try many different drums, with different tunings to select what sounds good to you. And the colors come in the thousands! For the beginner, choose your favorite color, number of drums, and good, solid hardware that will stand the test of time.
You’ll also need cymbals. One basic “ride” cymbal, maybe sixteen to twenty inches, a pair of highhat cymbals (with a highhat stand), maybe fourteen inches in diameter, and optionally, a crash cymbal, about sixteen to eighteen inches. Each cymbal should have its own adjustable stand. Next you’ll need hardware. This includes a drummer’s throne, an adjustable snare drum stand, and possibly some hardware to attach the small tom-tom to the bass drum, legs for the floor tom-tom, and finally, a pedal for the bass drum. Normally, the bass drum pedal has a single beater, but nowadays double (and sometimes triple) beaters are attached for exciting bass drum solos. We’ll stick with the single beater because this is where you will want to start. When you select your first drum set, that is, if you buy it new in a music store, try to obtain the highest quality drums, cymbals, and hardware you can find and afford. Not only will the equipment stay usable for many years, but it will appreciate in value if you keep up with the maintenance. Keeping your drums in “brand new” shape will pay dividends down the road. It shows that you care about your equipment, which means that you care about the music, the band, and yourself. Take pride in yourself, and in your equipment – it shows on the bandstand and in all facets of your life. If you want to save lots of money on your first drum set, you can look for used equipment. You have to take what you can find, obviously, but you can obtain some very good drums that are not used by the drummer anymore – or that he/she has moved on to another set and wants to get rid of his/her first kit. Try to get used drums that may have only cosmetic damage, not ones that need expensive repair. You can build a terrific set of drums by carefully selecting what you find and by applying some TLC. Sometimes you can combine more than one set into your ultimate instrument. Cymbals, too, can be found used. Just be sure that there’s no major damage, no “chunks” missing on the cymbal, that it is still round with no damage on the edges, and that it sounds good to your ear. That’s really the deciding factor – how it sounds to you when you strike it. I’m still using the cymbals that I purchased more than fifty years ago. They still sound great and normal cleaning keeps them looking like new.
Drum sticks are an important part of your kit. They are your connection to the drums, so select them with care. When buying sticks, be sure that they are matched to each other. That is, make sure that the sticks are the same weight, and that they are straight, rather than warped. To select properly, you must take a handful of sticks of a certain type (like 5B, or 5A, for example) and roll them on a flat surface to be sure they are not warped. Having picked out several, test them for weight. Tap them on your practice pad and pick out those that feel even to you. You can mark them with paint or tape so that you can pick them out of your stick bag easily when you need them. In addition to sticks, drummers use brushes, mallets, and bamboo sticks to strike cymbals and drums. The type of music, and the band’s selection of tunes will dictate which you choose on the bandstand. Mostly, you will use wooden sticks with nylon tips for your playing, but be aware that these are not the best for every song. As you enlarge your set, you may want to add “traps” like a wood box, cowbell, triangle, or bongales. These, and other interesting sound producing devices are handy for Latin music. Again, we will stick to the basic drum set for the present time.
For practicing, you will need a practice pad. This can be as simple as a towel covering the snare drum to muffle the sound, to a wooden platform with a rubber pad that sits on your snare, or on its own stand. Get your rudiments perfected on the practice pad before playing on the drums so you can hear yourself play cleanly and evenly. The practice pad, though not played on a gig or in a band setting, is one of the most valuable pieces of equipment you will have in your studio. Just add a music stand so you can read from the music book without looking away from the practice pad. The final equipment that I would suggest is a) books to study, b) lessons from an experienced teacher, here again, find the best you can because a good, experienced teacher is worth more than you can imagine. c) selection of CD’s and DVD’s to assist your study, and d) a good set of headphones so you will not be disturbed (and you won’t disturb others) while practicing.
To aid in these adventures, a trap case is a good investment. This is a large box, made out of tough material, that holds your snare drum and all the hardware that you must attach (or detach) from your set each time you move your drums. I have seen many drummers who have to make several trips to their car to bring in all their gear. Sometimes they drop loose pieces, or forget something that has fallen between the seats, or left at home. They are not organized and this can lead to an unhappy fellow if the boat leaves the port and you forgot your drum throne because you didn’t have it in the drum case. The cymbals can also go in the trap case, and the ride cymbal sometimes can be placed on the resonant head of the bass drum and held in place by turning the tuning lugs a quarter turn. On many bass drums these days, however, the tuning rods are operated with the universal drum key and they will not hold the cymbal in place. In this case, you must use a little ingenuity to carry the ride cymbal in a way that it will be protected but be attached to the kit as you move it from place to place.
Many years ago I played on a ferry boat during an afternoon cruise. The boat ran into trouble and was late in getting back to port – which took all the time I had allotted to get to the evening gig. We would have to travel about forty miles through rush hour traffic to get to the next gig, which was a steady job for the band. I was forced to enlist the help of several people from the party we just finished playing to not only help carry my drums from the ferry boat, but also to drive with us to the next job, they in their own cars and the band in ours! Thankfully everyone was trustworthy and all the instruments got to the second job – late! If I hadn’t had a good trap case in which to put all my gear, certainly something would have been lost in transit. We played an extra hour to compensate the club owner but we were lucky to have kept our jobs. Organization was the quality that helped us stay employed and I was eternally grateful to the fans who followed us and carried much of the equipment!
In the trap case you carry your hardware and snare drum to play the job, but also you should carry spare parts, and back up equipment. A second bass drum pedal, for example, is almost a “must”, as well as several extra pairs of sticks, traps (like a cow bell, maracas, or a tambourine) that you may not need right now, but having them in the case means you are likely not to forget to pack them when doing a Latin job.
Tools, at a minimum, should include two screwdrivers of a type to tighten any screw on your set, and a couple small wrenches for those times when you have problems with something that you didn’t even know you had. A spare drum key is always welcome so you can tune your drums if necessary. Sometimes your drums can go out of tune if the atmospheric conditions change enroute to the job and you need to retune something. Some electrical tape, a few clothes pins, and some paper clips can go into a small sandwich bag to sit in the bottom of the case. And, my personal favorite: 3-in-1 oil. Keeping your set lubricated will save you many times over the years. A small can in your trap case can last forever and when you must adjust something, you will not have to worry about rust in those little, forgotten places that attract moisture. You don’t want to be on a job and find a screw, or a tension rod, rusted solid and not be able to turn it. You know the old saying: “A stitch in time saves nine”. Having these tools with your kit ensures that you will never have a problem. Maintenance of your equipment cannot be stressed enough. Take your drumming seriously; keep yourself in good health, and keep your instruments in top condition always.
Care and Purpose of the individual drums
If we were to have only a single drum, it would be the snare drum. It is the most important drum in the set. On it you will play most of your solos, and keep a strong beat to guide the band through each song. The next drum to add to the set will be the bass drum, it is almost as important as the snare, and on it you will also keep a steady beat. With these two drums you can do any gig, in any type of music, and you will not be out of place. Together with the highhat and the ride cymbal, these two drums are all you need.
However, in this day of drum sets containing ten or fifteen drums of all sizes and tones, along with even more cymbals than drums, the first paragraph may sound strange, indeed. Most huge drum kits are assembled for show first, and sound second. If you watch rock drummers play, you will see that they look very exciting with the dazzling lights and huge sets. But, take notice of which drums they play most of the time and you will see that the snare drum and the bass drum are used most. There are places for the tom-toms and extra cymbals, but be aware that all the other drums, cymbals, and traps support the sound of the snare and bass drums. By concentrating your study on the two most important drums in the set – the snare and bass – you will do yourself a favor. Invest most of your financial resources in these two drums, a really good ride cymbal and highhat, and you will be able to play anything and you will have a set that you can sell for many times your investment fifty years down the road.
But, almost no one plays with only two drums. Of course you want some tom-toms and crash cymbals. The standard four piece kit with ride and crash cymbals (and the highhat), are standard for a reason. Not only does the standard set look good, but it also gives you much more freedom to expand your solos and beats. Sometimes, for example, the side drum is used instead of the ride cymbal on certain rock songs for a heavier beat, and to put more fill in the song. Your tom-toms can become most useful in any form of music, including cross-hand movements that look dazzling to the audience! In choosing your kit, it would be best to try to get a matched set, that is, all the drums the same color, with the same lugs on all the drums, so that you have some continuity in your instrument. Let’s face it, playing drums on stage is an entertaining activity. You’ll want to look the part, as well as sound the part, of an exciting drummer.
Next, let’s look at some interesting things that you may not know. It should be common knowledge that being on time for a gig is mandatory. This means that, if the job starts at 8:00 PM, for example, you need to be there at least a half hour early so you have time to set up your drums. But also, make provision for those times when traffic jams, or unavoidable problems interfere with your ability to get to the place at a comfortable time. You will need to practice setting up your instrument at home so that you know exactly how long it takes to set up everything in preparation to play the first tune. I learned early on that I needed to be able to set up my drums in less than five minutes from the time I pulled into the parking lot to the beginning of the first song. Believe me when I say learning to do that saved me from embarrassment and unemployment many times! At the end of a gig, when putting away your drums, speed and efficiency are also necessary because you could have another job to go to, or you may be tired from your performance and you want to get home to go to sleep. Having a method for set up and take down is a handy thing to develop.
Caring for your drums is important for several reasons. First, you want your stage presence to be top notch. This means that just looking at your set on stage will be exciting for the audience. Refrain from marking the drums with silly decals and stickers, this looks ridiculous and is a sign of an amateur person who is not serious. Treat your drums the way any serious musician treats their instrument: with respect and care. After all, this kit may be the tools by which you make a living, either at present or in the future. Your drums should always be clean, neat, in good repair, and with all chrome shining brightly. A drop of oil on all moving parts, like the bass drum pedal and highhat, prevents sticking of these parts and makes it easier for you to play interesting solos.
Next, anything that is associated with you (your instrument) should reflect you as a person and as an artist. Keeping everything looking good, including your hardware and cymbals, means to the audience that you are someone worthy to be listened to as you play. You are respecting the audience and they will respect you in return. Tuning your drums is important, too.

Tuning drums covers a wide amount of different sounds. Most other instruments have to adhere to specific tones when they are tuned. Drums are not confined to these dictates. If you want a soft, deep sound to your drums, you can tune them that way. Likewise, a higher pitched, stark and penetrating sound can also be achieved. The choice is yours to make the drums sound the way you like them, and tuning your drums to match the type of music you play is a smart idea. For jazz, you may want a lighter, softer sound; heavy rock music calls for a brighter, heavier sound so you can keep up with the rest of the band. Part of the tuning process is the muffling that can be added to fine tune each drum. The snare drum, your most important drum, will require the most time and care in tuning so that it matches what you want to play. The tom-toms need just a bit of muffling on the resonant head, and the bass drum is easiest – just put a small pillow inside it touching the resonant head. More muffling means a “deader” sound; less, or no muffling, means a louder, brighter sound. It takes a bit of time, but it’s fun to do and you would be amazed at all the combinations of sounds that you can achieve.
In addition to adjusting the heads and adding muffling, you may also add microphones to amplify your set. This is done in the recording studio, or on gigs where there is a large room and (potentially) hundreds of people in the audience. For most gigs, your basic acoustic drums will suffice. If you ever get to the really big venues, you can let the sound crew amplify your kit – they know what they are doing. For now, don’t be concerned about anything except tuning your drums for the best tones and volume necessary for your band.
How to hold the drumsticks
How to hold the drumsticks – and warm up for your hands, wrists, and arms (see Stretching Exercises video). Playing drums is a physical activity, as well as an artistic one. Before starting to play (for practice or a gig) you need to loosen your hands, wrists, and forearms with twisting movements. As seen in the video demonstration there are several simple exercises for warm up. These exercises take practice to perform and if you cannot move in the way the video shows, just keep practicing until you get it. Partial movement is fine in the beginning, you just need to loosen up muscles that may hinder your playing. And you will not be able to gain speed in your playing without your muscles warm and loose. Also, tight muscles tend to cramp, and this can be uncomfortable, so don’t skip this procedure. Remember: a little warm up goes a long way toward keeping you comfortable while you play.
Of the many ways to hold the drumsticks, we will restrict ourselves to two. The traditional grip, and the matched grip. By far, the traditional grip is the best and longest running way to hold drumsticks for playing. Though no one has said definitively “how” the traditional grip came in to being, I think I can suggest a possibility.
When a street drummer plays in a parade, his snare drum rests on his left leg as he marches, and of course, is held by a strap going around his upper body. The drum, as seen from the front is on an angle. He must play in this way, with the drum to one side, and the traditional grip makes it more comfortable for his hands to strike the batter head, since he must strike the head evenly with each hand. If he were to use the “matched grip”, his left elbow would be elevated and pushed to his side, thus making it look awkward and causing his left side to cramp. When the trap drums evolved into a stationary position, the hand position remained because it is just as comfortable to play as it was on the street drum.
There are times, however, when the matched grip is appropriate, as when the drummer may use the side tom-tom(s) for a solo, but other than just a few times, the traditional grip is the most professional – and the most comfortable – grip to use. In the end, it is what feels comfortable to the individual that is most important. Most of the drummers today, especially in rock groups, use the matched grip; most jazz drummers prefer the traditional grip. You should study both so you can switch from one to the other when needed. Also, if you are right-handed, you should be able to switch over to playing the traditional grip left-handed. Having more dexterity than may be needed is a good thing. Supposing, for example, you want to “sit in” on a left-handed drum set, but you are right-handed. You would be most comfortable switching to a left-handed grip in this case – hey, you never know!
It is important to mention that, if you are right-handed, you need to learn to play on a right-handed drum kit with a right handed grip. Conversely, if you are left-handed, then you need to reverse everything, play on a left-handed set and use a left-handed grip. There are drummers who prefer to use a right-handed grip, and play on a right handed set, who are naturally left-handed. The choice is up to the drummer, but being comfortable in your playing is more important than trying to keep up with misguided convention. Having said that, as a student, you need to become facile with both hands, and learn to play in every conceivable position. If you never have to change things on a gig, that’s great, but you will be more flexible, and faster, if you train your muscles in several ways.
Holding the sticks properly is very important. And the grip on each stick is very precise. Here’s an area where you don’t want to get sloppy. I recall when I first took lessons. I was taught on a practice pad and I was instructed to hold the sticks exactly so that I could increase my abilities. Every lesson was emphasized by correct stick holding and execution of every stroke. It was six months of strict attention to detail before I was allowed to sit at the drums! While these days drum teachers are more tolerant in terms of teaching, I am glad that I had this strict instruction because from that point on, I never had trouble playing any figure correctly, reading a drum score, or extracting the best sound from a drum. In the video we show you how to hold each drumstick and why. Since a picture is worth a thousand words (or more) refer to the video demonstration for correct instruction while we move on here to the next step.
Simple rudiments and music theory
There are, give or take, about twenty-seven rudiments that a competent drummer will master over time. Oddly, not all of these rudiments will be used in playing gigs, or jam sessions, but knowledge of all the rudiments (which means practicing them, too) is vital to your professional playing if you go that far. Happily, for those of you who just want to play in a simple band with your friends for now, only a few rudiments are necessary. These are: 1) single stroke roll, 2) double stroke roll, 3) flam, and 4) single paradiddle. With these four rudiments you can play any music, and on any gig you want.
There are lots of good drummers who will only use two, or three, of these figures – and with great results. It is the same with any profession, if you have talent, you can use the simplest of tools to sound good. Watch the classic drummers, like Buddy Rich, Gene Krupa, Steve Gadd, and so many others, and you will see that they use very simple tools to achieve fantastic results. Be sure to execute each stroke exactly as shown before you move on to the next figure. I have provided some fun projects for you to learn and perfect, all with each of these four rudiments. Take your time, be sure each stick moves exactly as taught, and before long, you will be able to play simple, good sounding fills and solos. But, the cleaner you play, and the better you take heed of the correct stick holding and drum striking, the better, and faster, your fills will sound. There’s no rush, so keep going back to the beginning and relearn each lesson so that your brain understands all the nuances of the sticking patterns.
Music theory, the science of organizing what we play, does not require playing the instrument (drums in this case), it is how we understand that which we play. Now we enter the world of staffs, notes, rests, and endless combinations of these notations so that we can play music the same way, every time, that is required by a score. If you have a knack for this kind of work, theory and writing will be exciting and pleasurable, if not, don’t worry, we’ll make your introduction into reading very easy.
The elements: Notes are a way of writing music so we know what to play. There are whole notes, half notes, quarter notes, eighth notes, sixteenth notes, and so on. There are rests too, and they follow the same length of time as the notes, whole rests, half rests, and so on. The “staff” is the lines upon which we write the notes and rests and other notations. Sometimes there are several staff lines and they are used only when necessary. All music is written with these elements, but drum music is a little different. Since there are no “tones” like there are on a piano, or other instruments, we don’t have to be concerned about “key”. We have, basically, one tone, the sound that is produced by the drum that you are striking. If you write for four drums, you might utilize four levels on the staff. Or, you might use different markings on a single line. For example, in the Fun with Rudiments section of the video, you will observe that we use a simple circle and a simple box to show where we want to strike a different drum. This method simplifies our reading and allows us to gain speed and accuracy.
Since this guide is only intended as an introduction, I will refer you to the many drum books that you will find in any good music store. Purchase one or two different books covering basic reading skills, with exercises covering most of the pages in the book. If you can find them, the books written by Al Miller demonstrate many figures that are easy to understand. Using these books written by the great drummers of a few years ago will show you easily how to perfect your reading skills. If you decide to take drum lessons from an experienced teacher, then tell him/her that you want to learn to read music. This will put you miles ahead in your study of drums and you will see that the playing of drums can be a lot of fun.
Playing on the drums
As mentioned earlier, the use of a practice pad is paramount to developing your skills. It is recommended that you spend most of your practice time – especially in the beginning – on the practice pad. Once you perfect your rudiments, and have gained a bit of speed, you can transfer your playing to the drums. So, we start on the practice pad for the hands, and you can rig up something for the bass drum pedal if you desire. The idea is that you want to hear what you are playing, but you don’t want to disturb anyone else. Believe me when I tell you that practicing drums is a very loud affair, and not something that people in the next room are too keen to hear. Practice when no one else is around, or in a sound proof room, or put small towels on the drums. This way you retain your family and friends while still learning your instrument!
When you sit on the drum throne it should feel as comfortable as when you sit on a normal chair. Your legs form a “V” and your hands should be in the vicinity of your upper legs. This is the start position. The snare drum (or practice pad) will occupy the space between your knees; hold the sticks with the traditional grip and raise your arms just a little so that the sticks form a ninety degree angle with the tips of the sticks one inch apart. They should be held a little bit over the snare drum head. All stick strikes should hit the drum heads at the center of the drum. This is true for all the drums. When adjusting the set, make sure that you can easily reach the center of each drum (except the bass drum) head. Doing so will facilitate your striking the drums in a uniform manner, where each stroke will sound the same.
For the bass drum, position your throne/bass drum so that your right leg is comfortably situated to operate the bass drum pedal. Though there are several ways to utilize the pedal (foot flat on the pedal, heel-toe, ball of the foot, etc.) we will stick with the standard method of keeping the foot flat on the pedal. Later on, when you want to play heavy rock music, you may want to experiment with different ways to use the pedal for effect.
The left foot operates the highhat. Position the highhat stand so that you can comfortably operate it with the left foot. Go for comfort; not too far away; not too close. The height of the highhat cymbals is also important. You’ll want to keep the cymbals about five to six inches higher than the snare drum head. Doing so will allow you to play with the right hand on the cymbals while the left hand strikes the snare drum head. If you put the cymbals too low, you’ll tangle your hands into each other and you’ll be unable to play. Conversely, positioning the cymbals too high means that you’ll have to travel too far when moving from the cymbal to another part of the drum kit. But, again, comfort is paramount. Position all elements of the drum set so that it is comfortable for you to strike each part of the set with minimal movement.
The cymbals need to be positioned so that you can easily strike each of them without stretching. You should be able to strike all of the drums and cymbals without moving your arms any more than a couple inches from the start position. If you want to gain speed, you will do well to have everything close enough so that a small turn of the wrist will enable you to strike anything on the set. In the video you will notice how the drums are set up and how easy it is to move from one drum, or cymbal, to another. Spend some time in the beginning to establish your ideal set up. Then set up your drums the same way every time. This will make your playing easier and it will look better to the audience to see lightning fast movement around the drums as you play a fill or a solo.
Refer to the video for demonstrations on how to strike the drums, how to play the cymbals, and for different methods of playing rim shots, Latin rhythms, and switching from the traditional grip to the matched grip in a millisecond. Accents are very important to create a certain rhythm or to emphasize signals to the band. All of these techniques will be shown on the video, so watch carefully and play it again and again until you can play with speed and confidence.